How to use Leawo Video Converter Ultimate
As a professional media software combo, Leawo Video Converter Ultimate integrates six main media software programs: DVD Backup, DVD Ripper, DVD Creator, Video Converter and Video Downloader. Although there are only 5 programs built inside, Leawo Video Converter Ultimate offers more. It can convert video/DVD/audio, create photo slideshow video, burn video/photo/ISO image file to DVD, clone and back up DVD file, download online videos and live streams, edit videos, create 3D videos and adjust output video/audio prameters, and more.

Back up DVD
Convert DVD/Video

Burn DVD

Download Videos

Media Editor
Photo Solutions
How to Back up DVD
With a professional DVD backup and cloner, Leawo Video Converter Ultimate enables you to back up and clone your DVD movies from disc, folder, ISO image file to computer or blank disc easily. It could back up both DVD-9 and DVD-5 content, regardless of the disc distribution, region and movie studios.
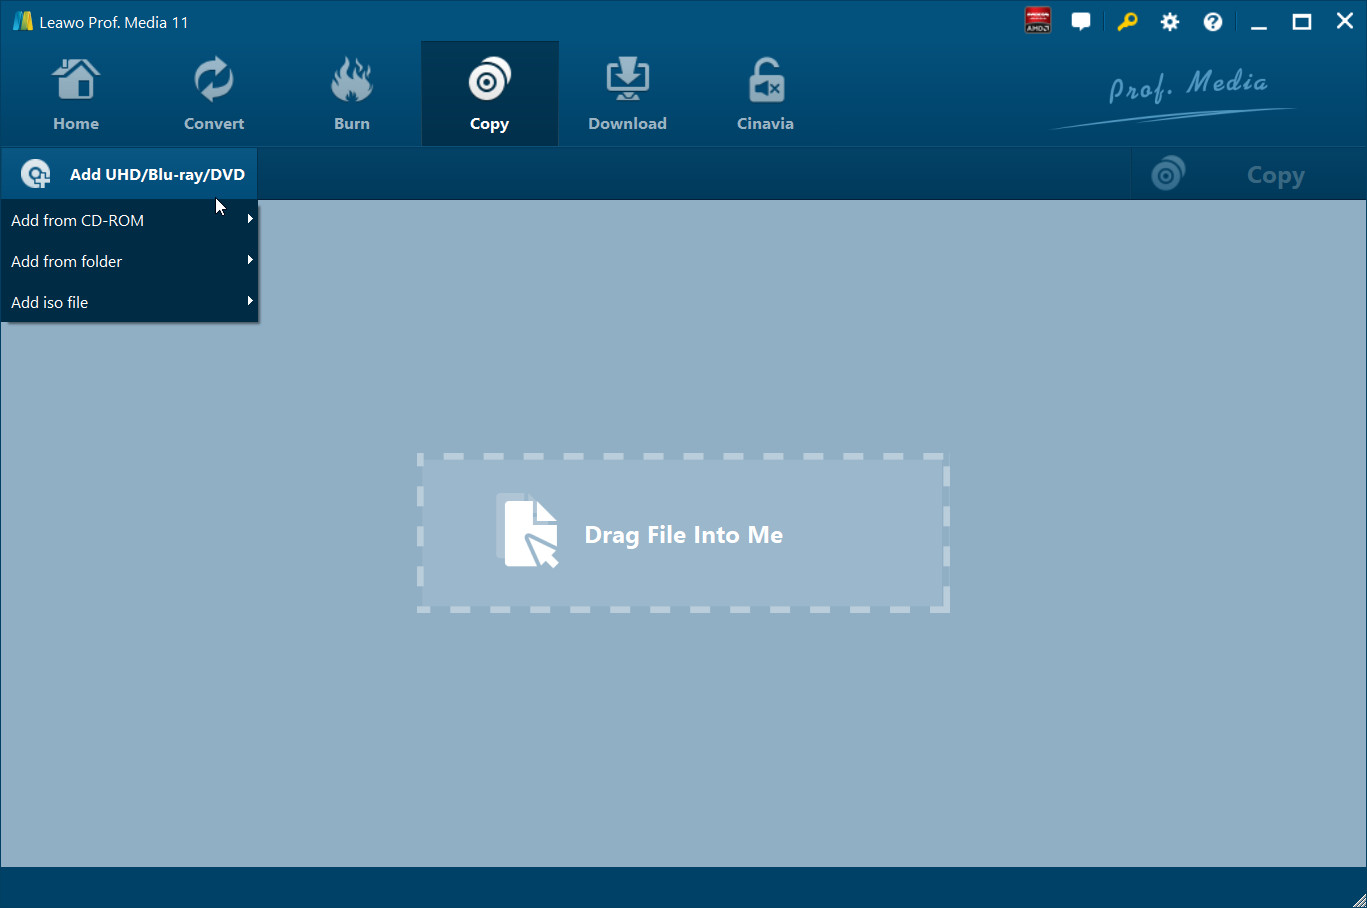
Step 1Add source DVD file
Under "Copy" module on the upper menu of the main interface, click “Add UHD/Blu-ray/DVD” button to browse and import source DVD disc, folder or ISO file for backup.
Step 2Select DVD backup mode
Once you have loaded source DVD files, 3 different DVD backup modes are available: Full Movie, Main Movie and Custom Mode. Full Movie will back up all titles in source DVD file, Main Movie mode allows you to select one DVD title for backup, while Custom Mode enables you to select desired DVD title(s) for backup. After choosing backup mode, select subtitles and audio tracks, and output DVD type at the bottom left corner.

Step 3More settings on DVD backup
Click the green "Copy" button on the right. There will pop up a sidebar, where you need to complete more DVD backup settings. In the "Copy to" option, select what you want to get: folder, ISO image file, or/and DVD disc. It allows multiple choices. Give output DVD file a name in "Disc Label" and set the processing directory in the "Save to" box.
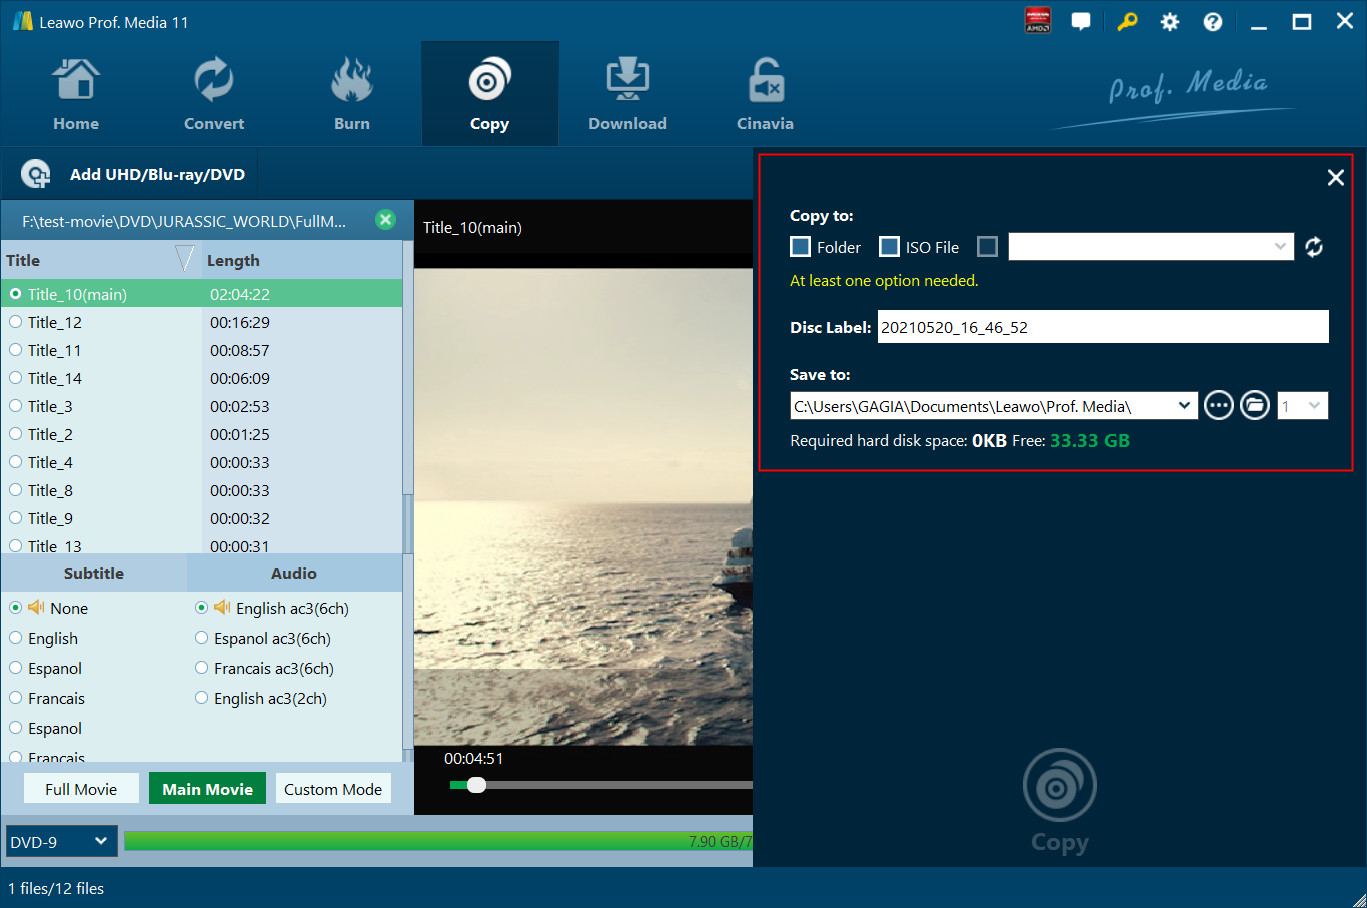
Note: 1. If you want to back up DVD to blank disc, insert a blank writable DVD disc into the DVD drive and select it as output target under the "Copy to" box.
2. If you have only one DVD drive and would like to back up DVD disc to another disc, you could firstly try to bakc up DVD disc to ISO file, and then back up the ISO file to DVD disc.
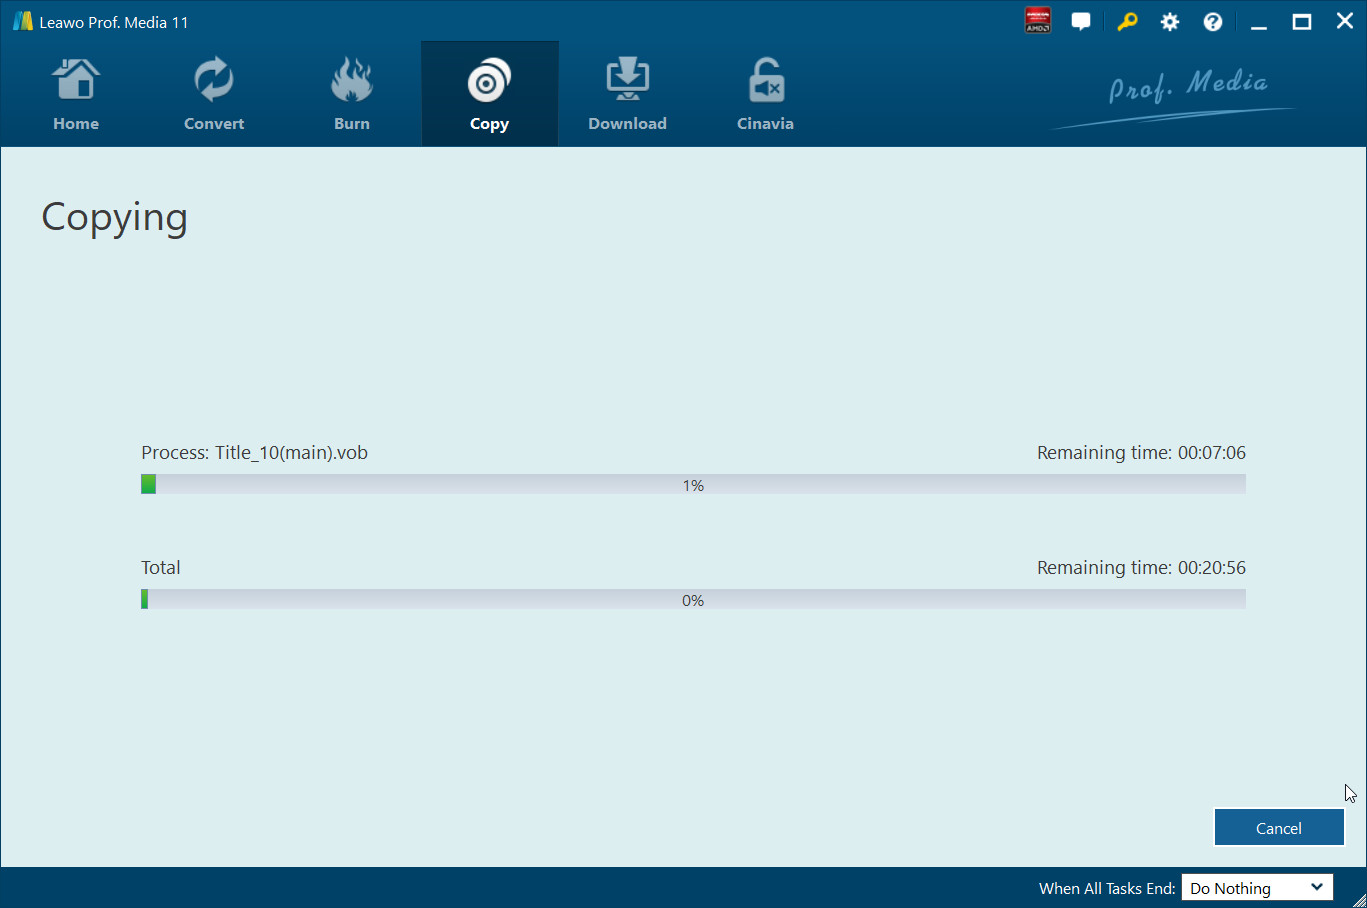
Step 4Start backing up DVD
Afterwards, click the bottom "Copy" button to start backing up DVD file. You then will see the backup process on the backup interface.
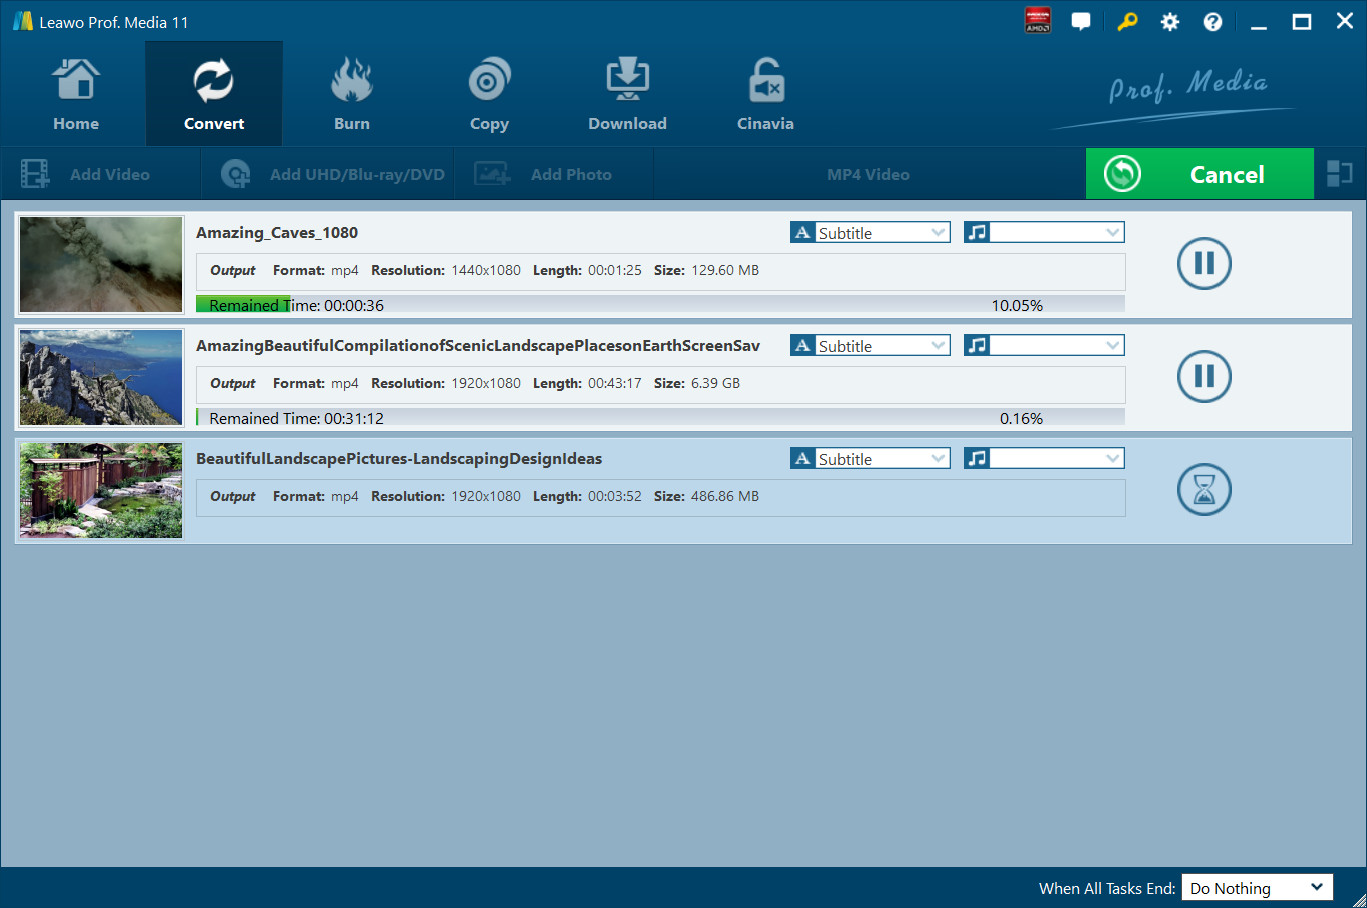
How to Convert Video/DVD/Audio
The software suite's key feature is to convert video, DVD and audio into more than 100 formats like MP4, MPG, WMV, 3GP, FLV, M4V, MPEG, MKV, etc. for multiple uses. In addition to over 100 output formats, it supports various players, devices and editing software programs, such as iPhone, iPad, Android Phone, Windows Phone, etc.
Step 1Import source DVD/video/audio files
Kick off Leawo Video Converter Ultimate, choose the "Convert" module on the top right of interface, and then click the "Add Video" icon to load source video files, or "Add UHD/Blu-ray/DVD" icon to import source DVD files to the software (or to import source video/DVD/audio files and video/DVD/audio folders by direct dragging-and-dropping).

Note: 1. After the source files are imported, you are allowed to select preferred subtitle and audio track to keep in the output file. If necessary, you can rename the output file for your convenience. Previewing the source content is also allowed on the built-in player, and you can get screenshots when you are previewing.
2. If you are going to get video/audio files off DVD files, after loading, you will be provided with 3 different loading modes: Full Movie, Main Movie and Custom Mode.
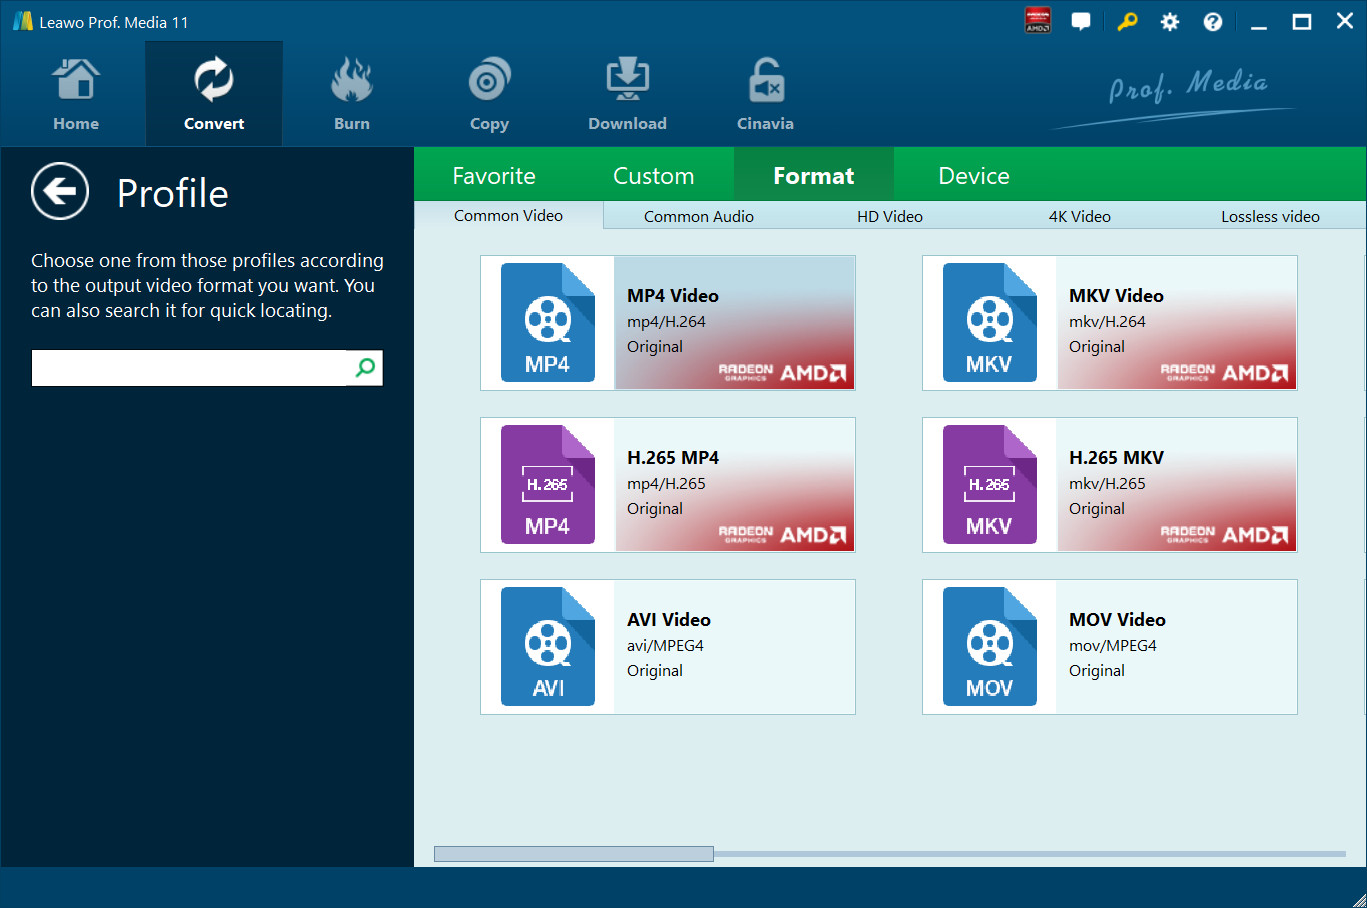
Step 2Set output profile
Click the drop-down button next to the "Add Photo" button on the sub-menu bar, then select "Change" option to enter the Profile panel, where you could freely select profiles from as output format. On the right side of the Profile panel, there is a profile searching bar for quick format locating. If you are tired of looking for the format, you can directly input the format name in the bar and the relative format will show itself, which will save you a lot of time and energy.
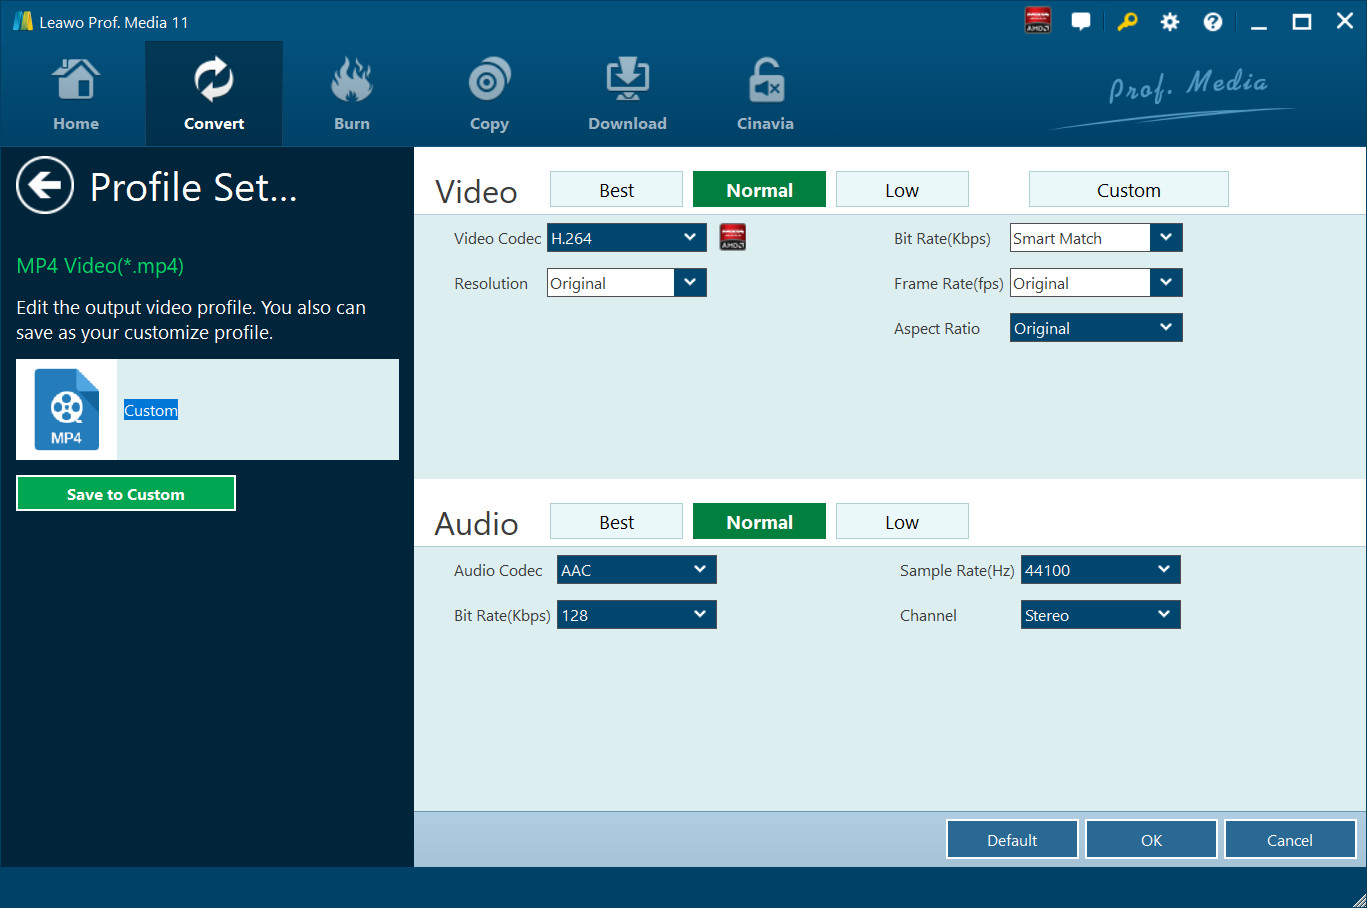
Optional: You can reopen the drop-down list and choose “Edit” option or click the edit icon on selected profile to adjust output file parameters in detail such as video codec, resolution, bit rate, aspect ratio, frame rate, audio codec, Sample Rate, Channels, etc. Press "OK" button to return to the main interface.
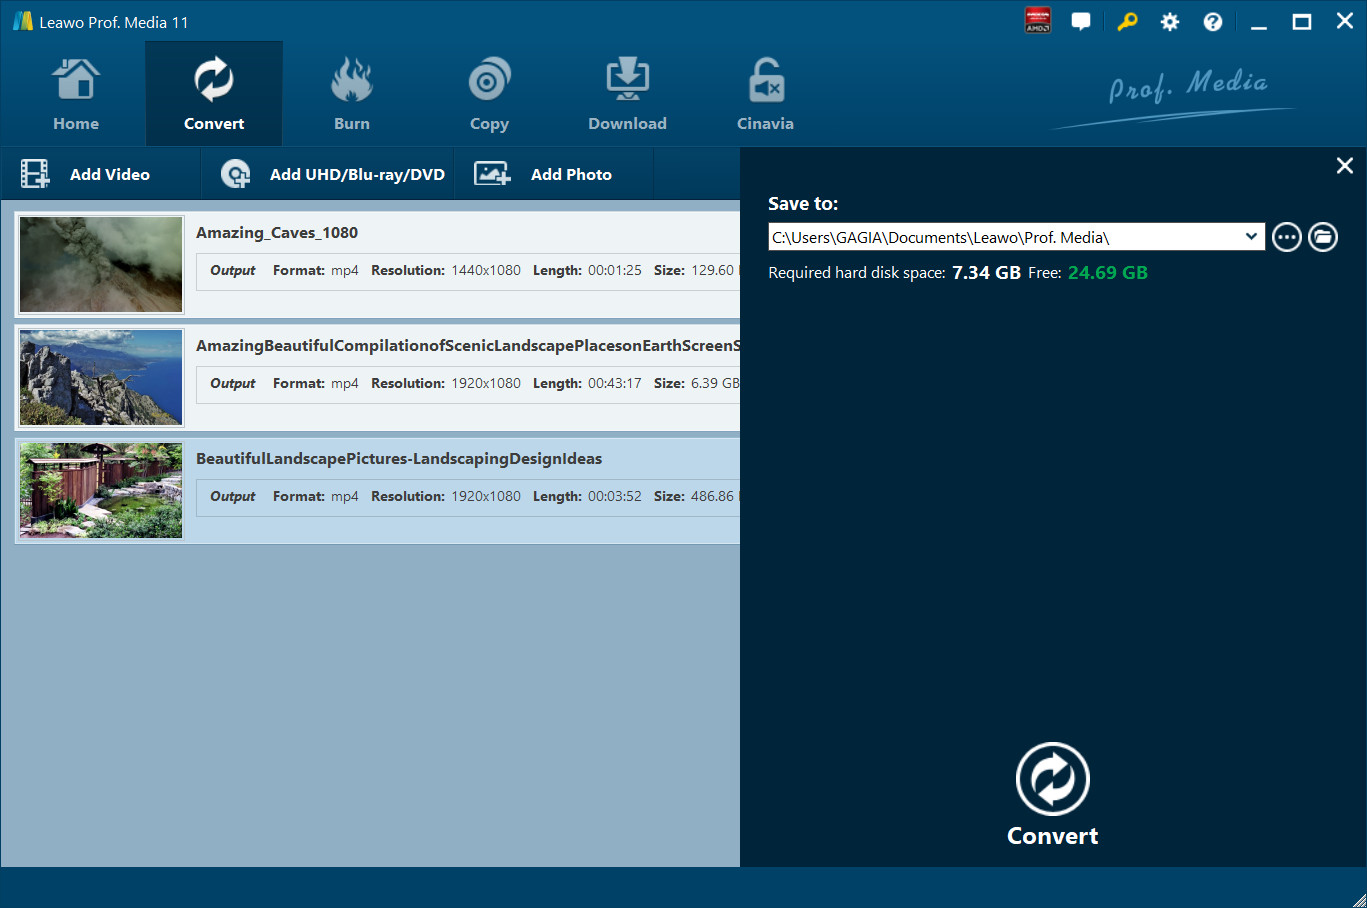
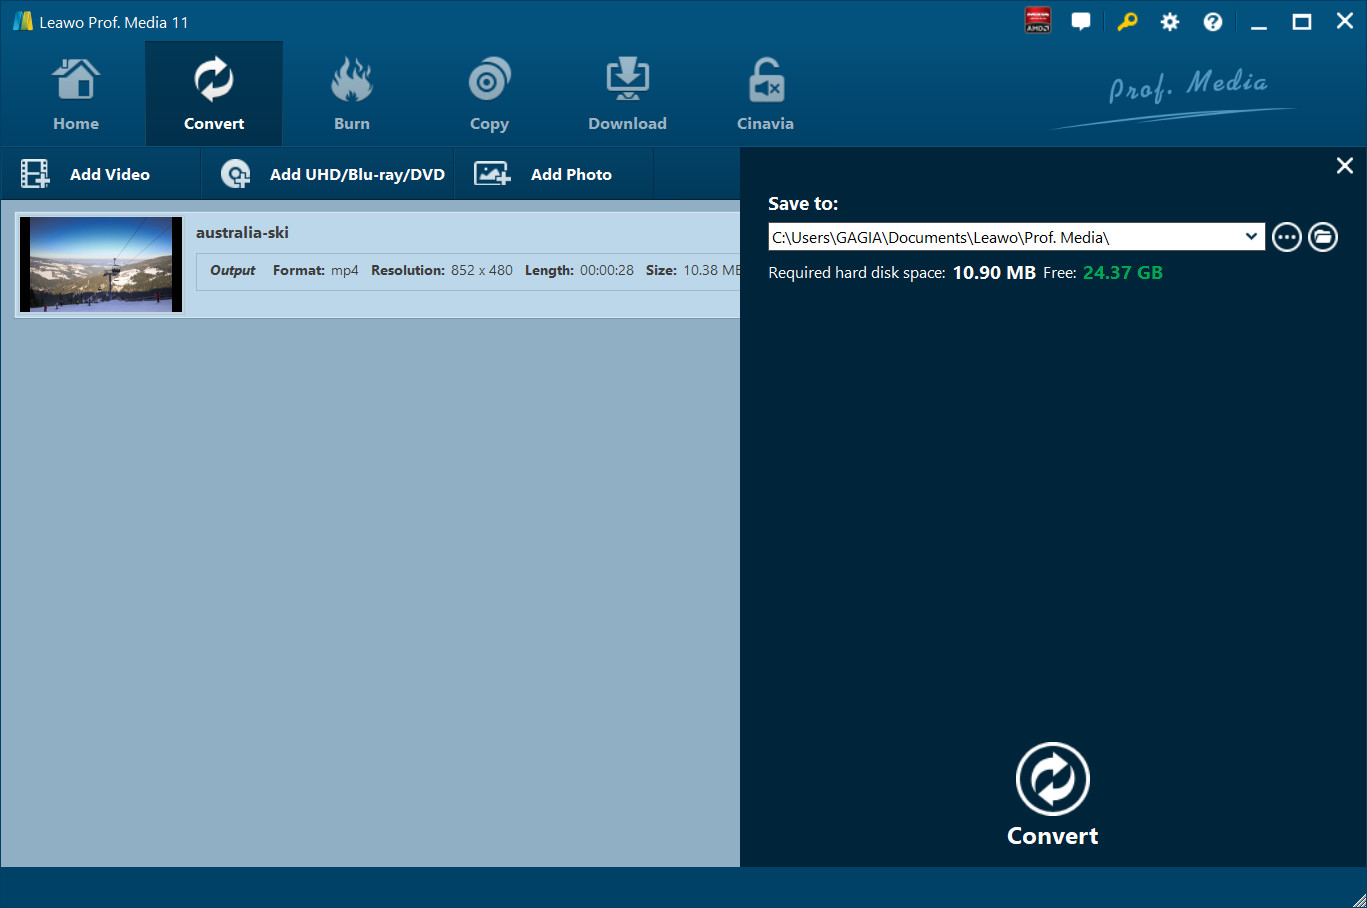
Step 3Select output directory
Click the green "Convert" button on the main interface to pop up a sidebar will pop up, where you can select output directory in the "Save to" box, and you can see the required hard disk space as well.
Step 4Start converting
Get the conversion process started by clicking the "Convert" button at the bottom of the sidebar and you are guided to the converting interface, where you could view and even pause/restart all converting progress.
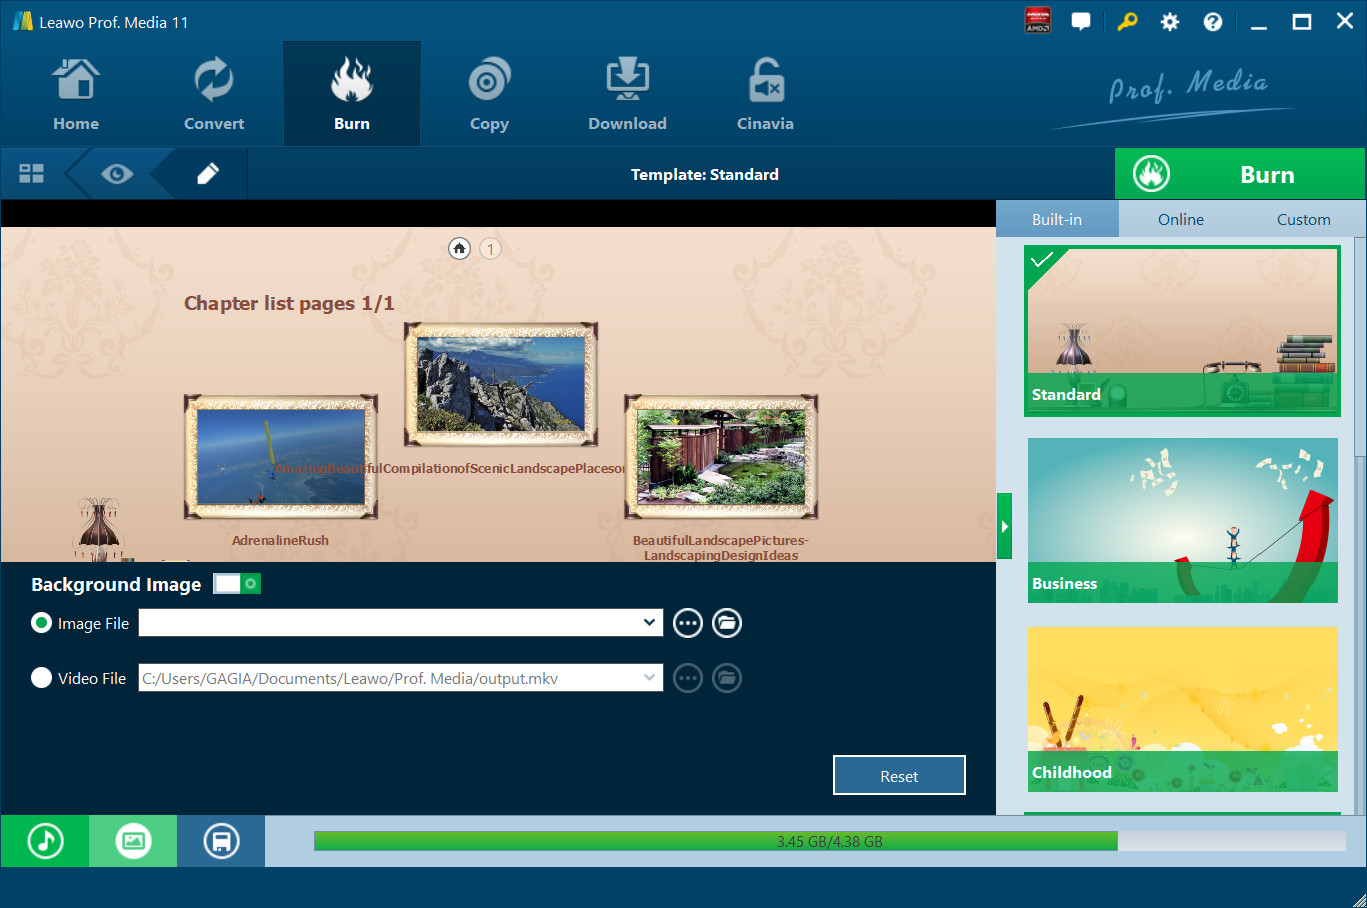
How to Burn Video to DVD
DVD burner inside Leawo Video Converter Ultimate permit you to burn common video to DVD(DVD-9 or DVD-5) contained in disc, folder or/and ISO Image File. Videos in 180+ formats such as MOV, MP4, MKV, MPEG, FLV, F4V, 3GP, M4V and so on could be imported to the internal DVD Creator for burning to DVD content. Equipped with many attractive templates, the program allows you to select preset disc menu and even design your own disc menu.
Step 1Import video files
Under "Burn" module on the upper menu of the main interface, click “Add Video” icon to import source videos or drag-and-drop source videos directly. Source video folders can also be imported for burning to DVD movies. When loading process is done, you shall set the target disc type(2 types available: DVD-5, DVD-9), quality and aspect ratio at the bottom of the program interface.

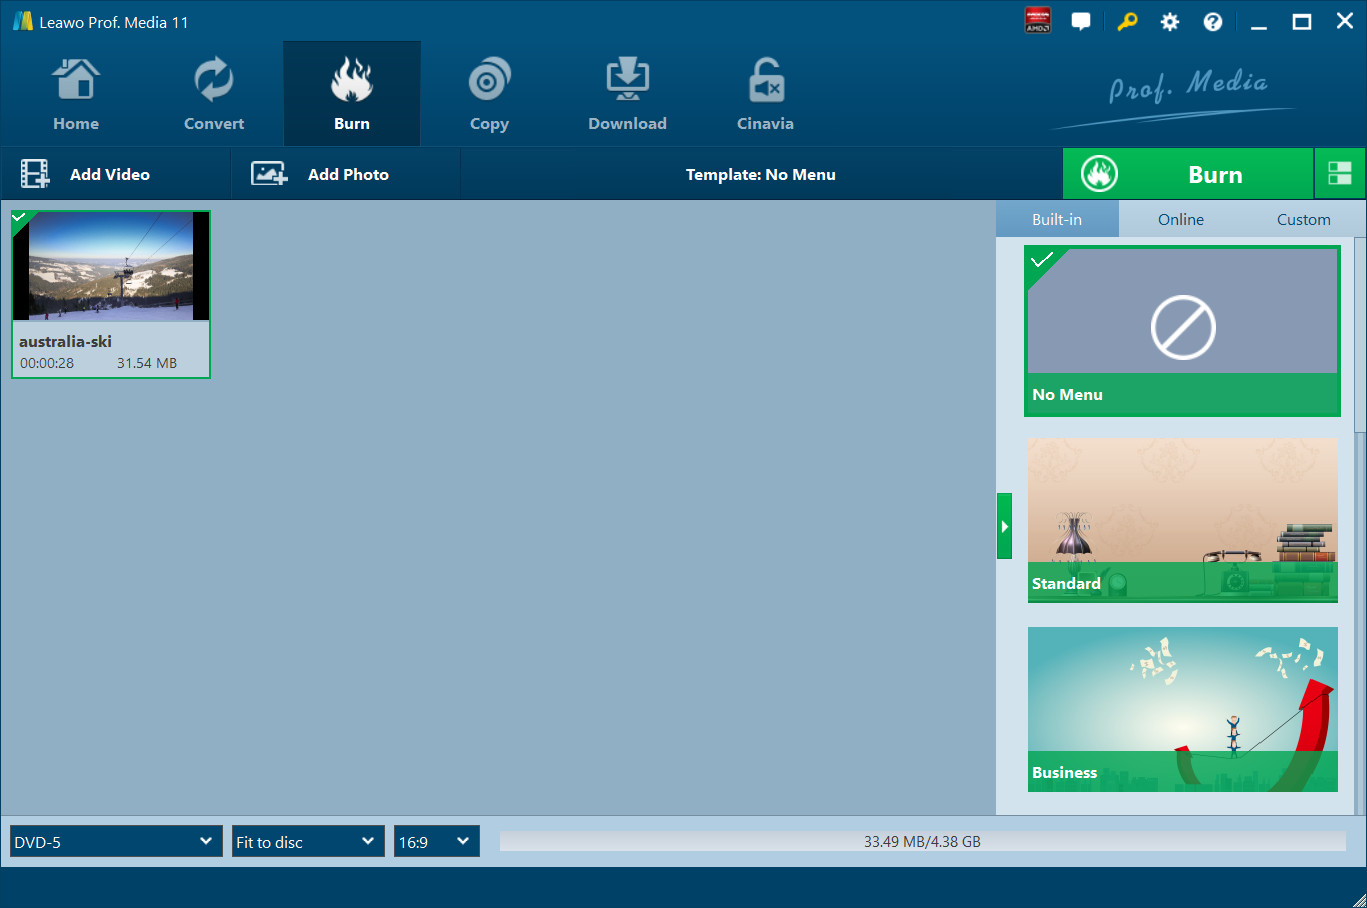
Step 2Select template to make disc menu
Select a template as disc menu from the right side and then click the eye icon on the middle to enter the disc menu preview panel to preview selected disc menu. Click the “Edit” pencil button to edit disc menu, or you can skip the editing process by simply clicking the green "Burn" button.
Note: You can choose "No Menu" button to disable disc menu function.

Disc menu customization:
On the disc menu editing window, you are able to customize disc menu by adjusting the title positions, renaming titles, setting the text font, adding background music and background image/video, doing chapter list panel settings, etc.
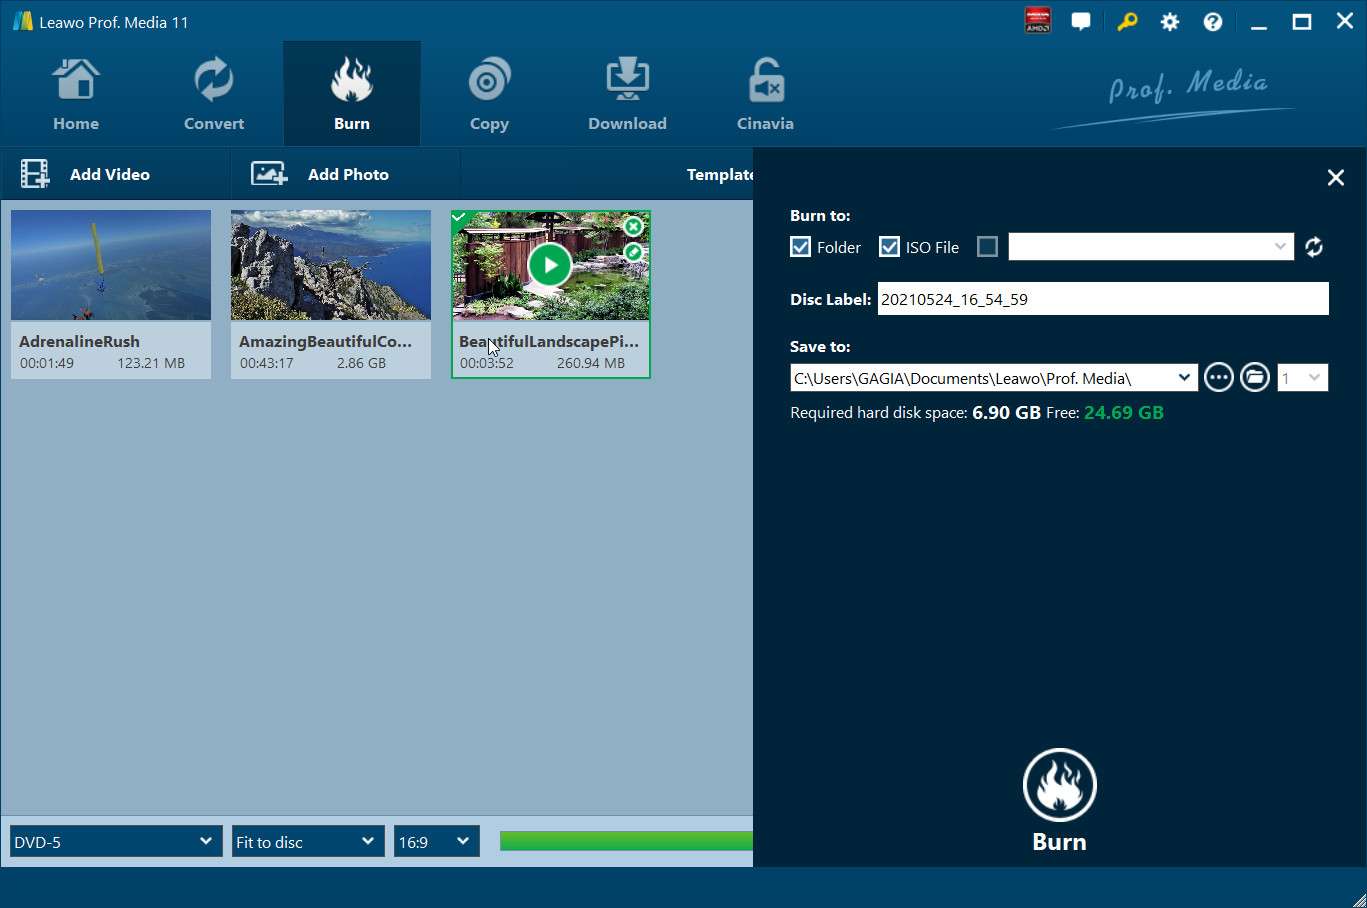
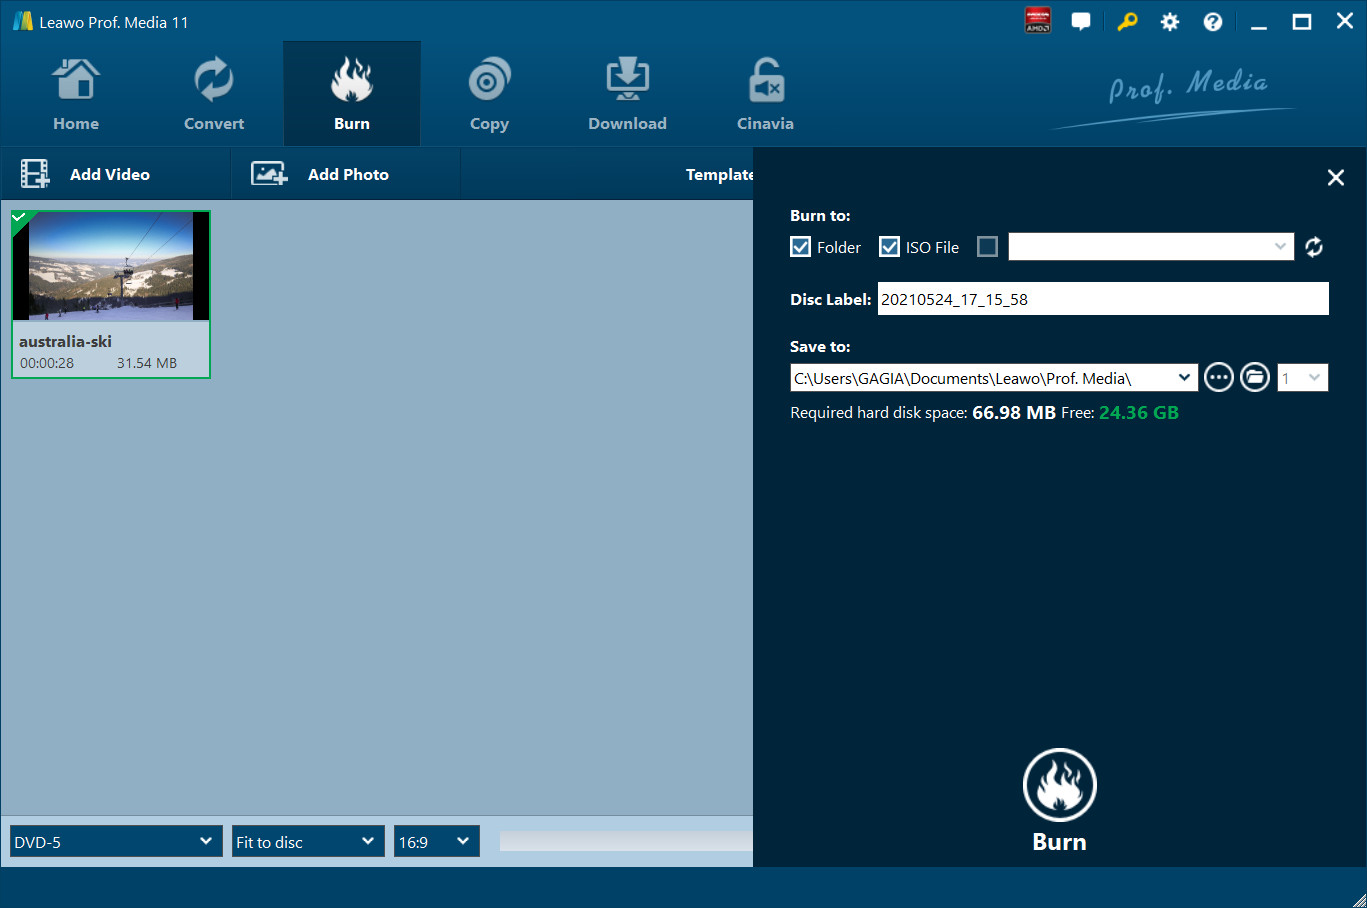
Step 3Start Burning video to DVD
After saving disc menu customization, click the big green "Burn" button to enter burning settings sidebar, where you need to set "Burn to", "Disc Label", "Save to". Burning settings done, click "Burn" button at the bottom to burn DVD.
Note: You can choose DVD folder burning, ISO File burning and/or DVD disc burning. It allows multiple choices. You shall choose at least one of the three burning options. Make sure to insert a writable DVD disc into the DVD drive if you are going to burn DVD disc.
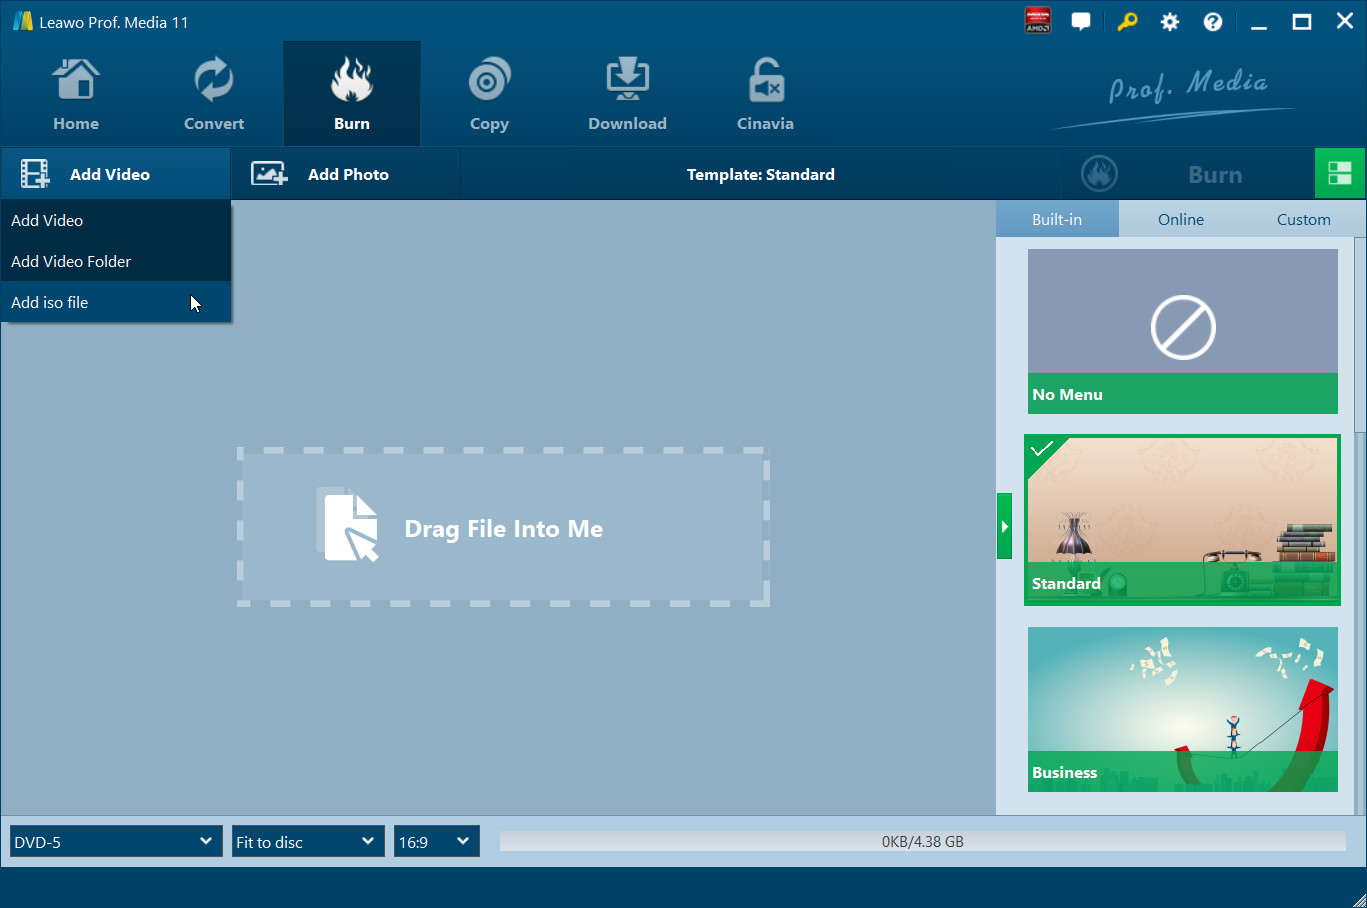
How to Burn ISO to Disc
Step 1Import ISO source file
Move the mouse to "Burn" button on the upper menu and click it to enter burning interfece, where you can click the inverted triangle arrow button next to the "Add Video" button to import source ISO file or simply drag-and-drop the source file.
Note: A blank and writable DVD disc is required to be inserted into the disc drive before the burning process takes place.
Step 2ISO to disc burning settings
The moment source file loading is done, an "Add iso file" window will pop up, on which you shall set "Copy to" and "Disc Label" options. Finally, click the "Burn" button to get the burning process from ISO to blank disc started.

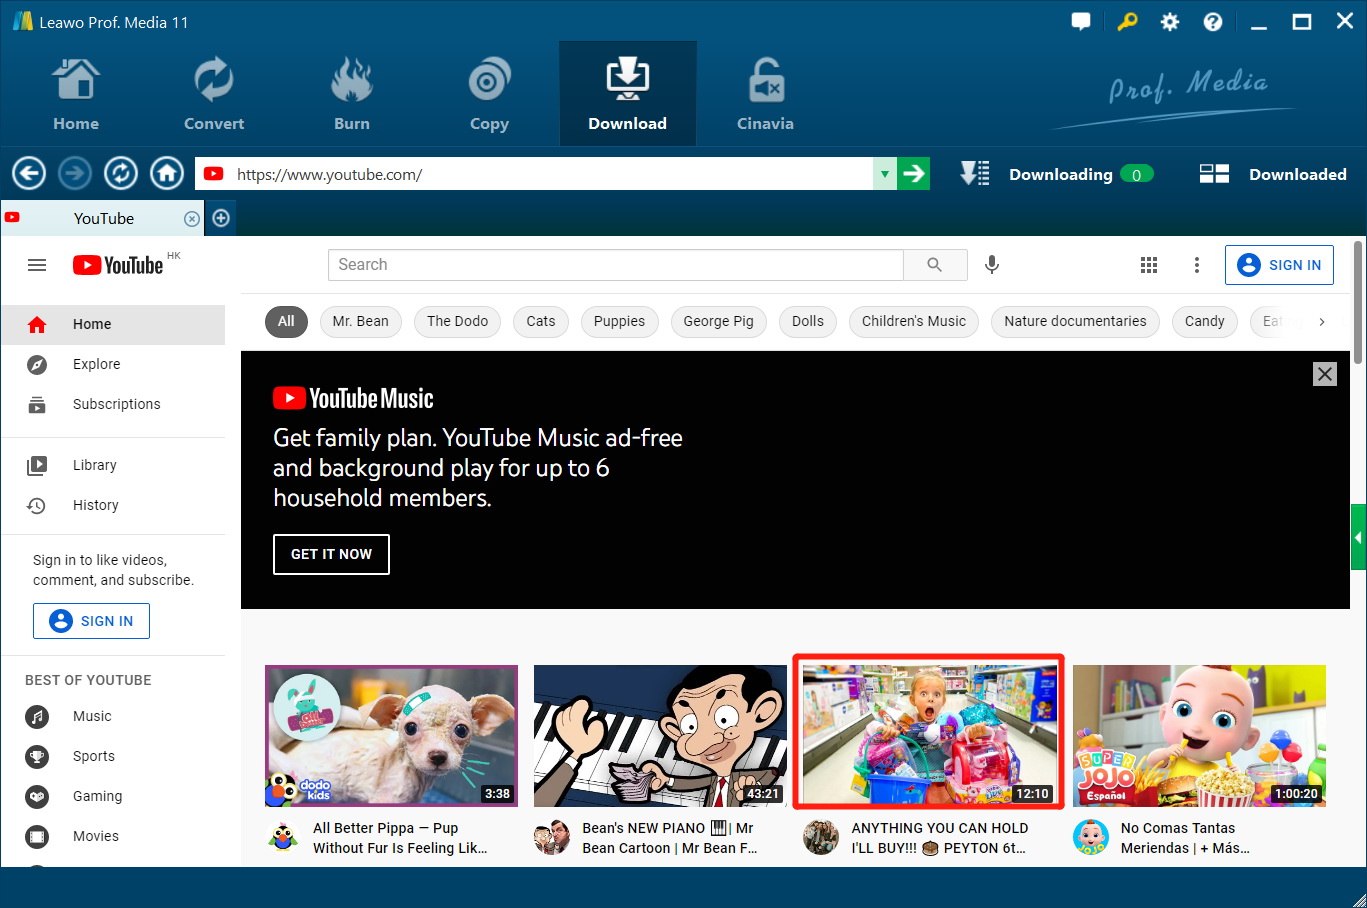
How to Download Online Videos
An online video downloader inside Leawo Video Converter Ultimate is able to download online videos from various video sharing sites like YouTube, Facebook, Dailymotion, Veoh, Liveleak, etc. With a built-in video accelerator and online flash video player, video loading process is extremely fast and online video playing is very smooth.
Step 1Paste video URL
Launch the free online video downloader by clicking "Download" button on the upper menu of Leawo Video Converter Ultimate, paste the URL of source video into the browser address bar and press "Enter" key on the keyboard.
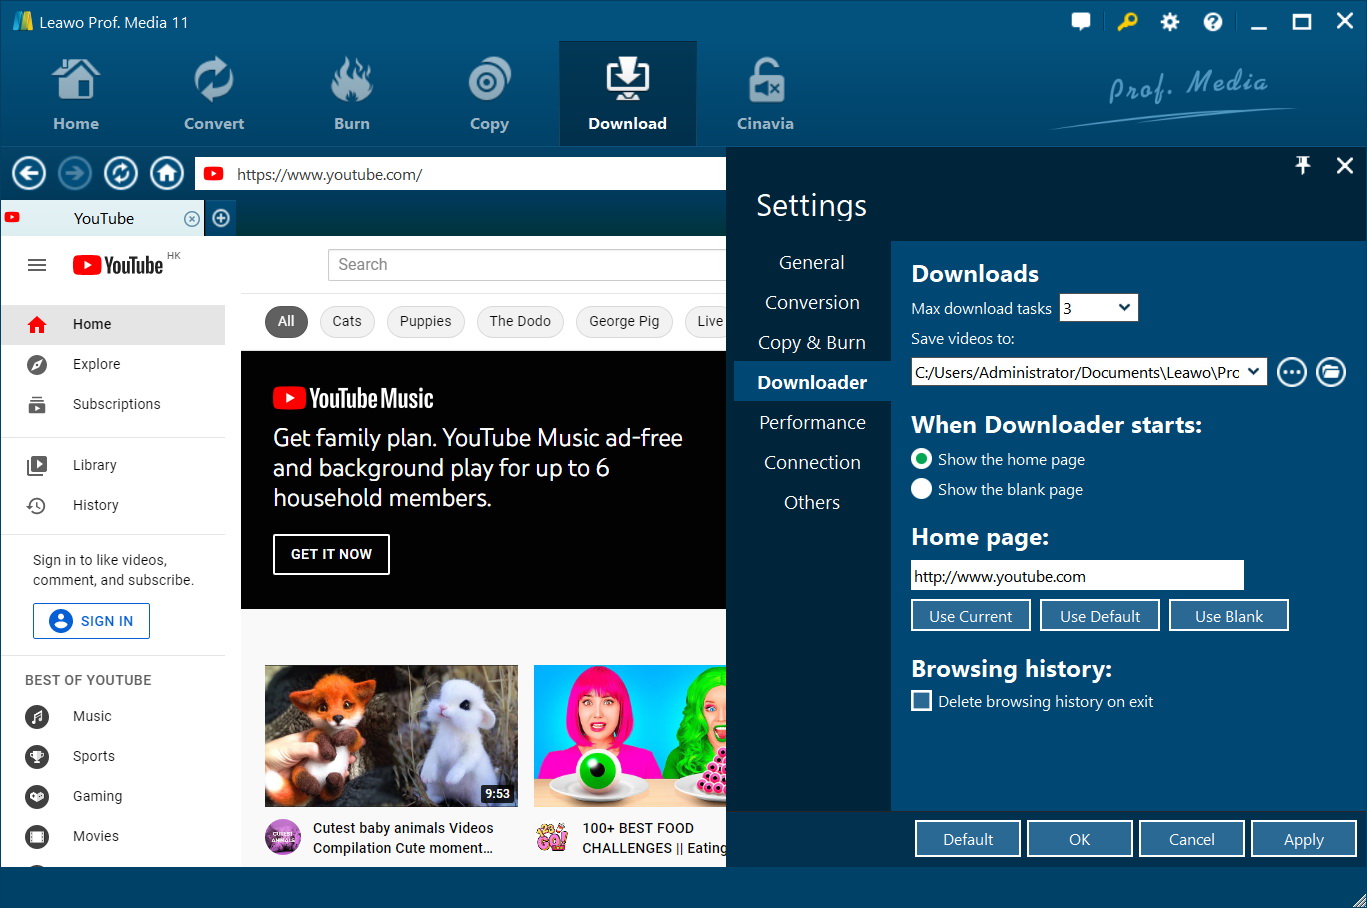
Step 2Set download directory
Click the wheel icon on the top-right corner and then open the "Download" tab to set a download path in the "Save videos to" box.
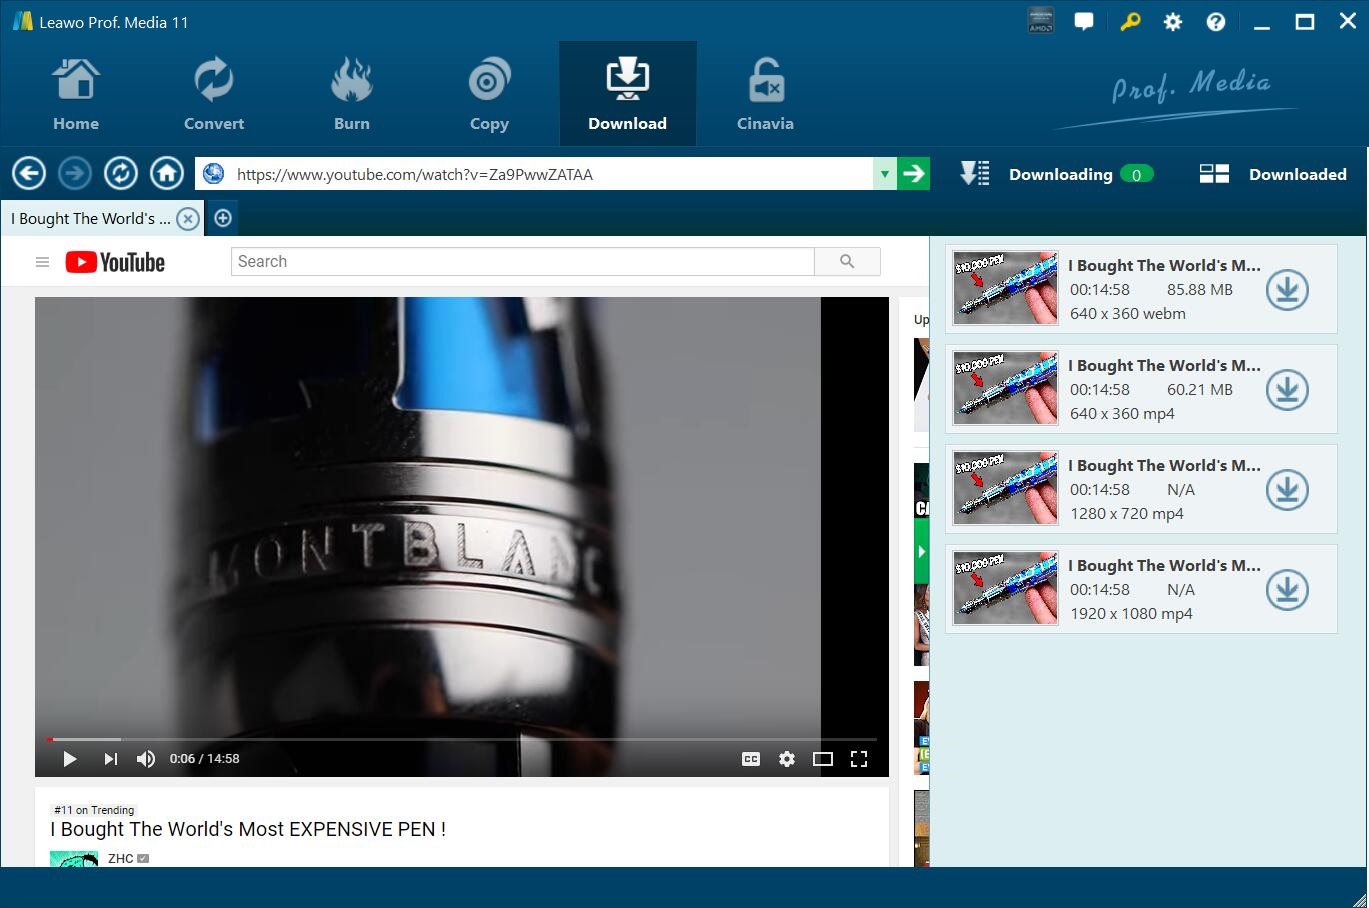
Step 3Get Target Videos
After pressing the "Enter" key, the online Video Downloader would automatically display target video for you. As you can see on the right sidebar, the video length, size, format, quality level will be clearly showed in each video for you to properly select the right video to download.
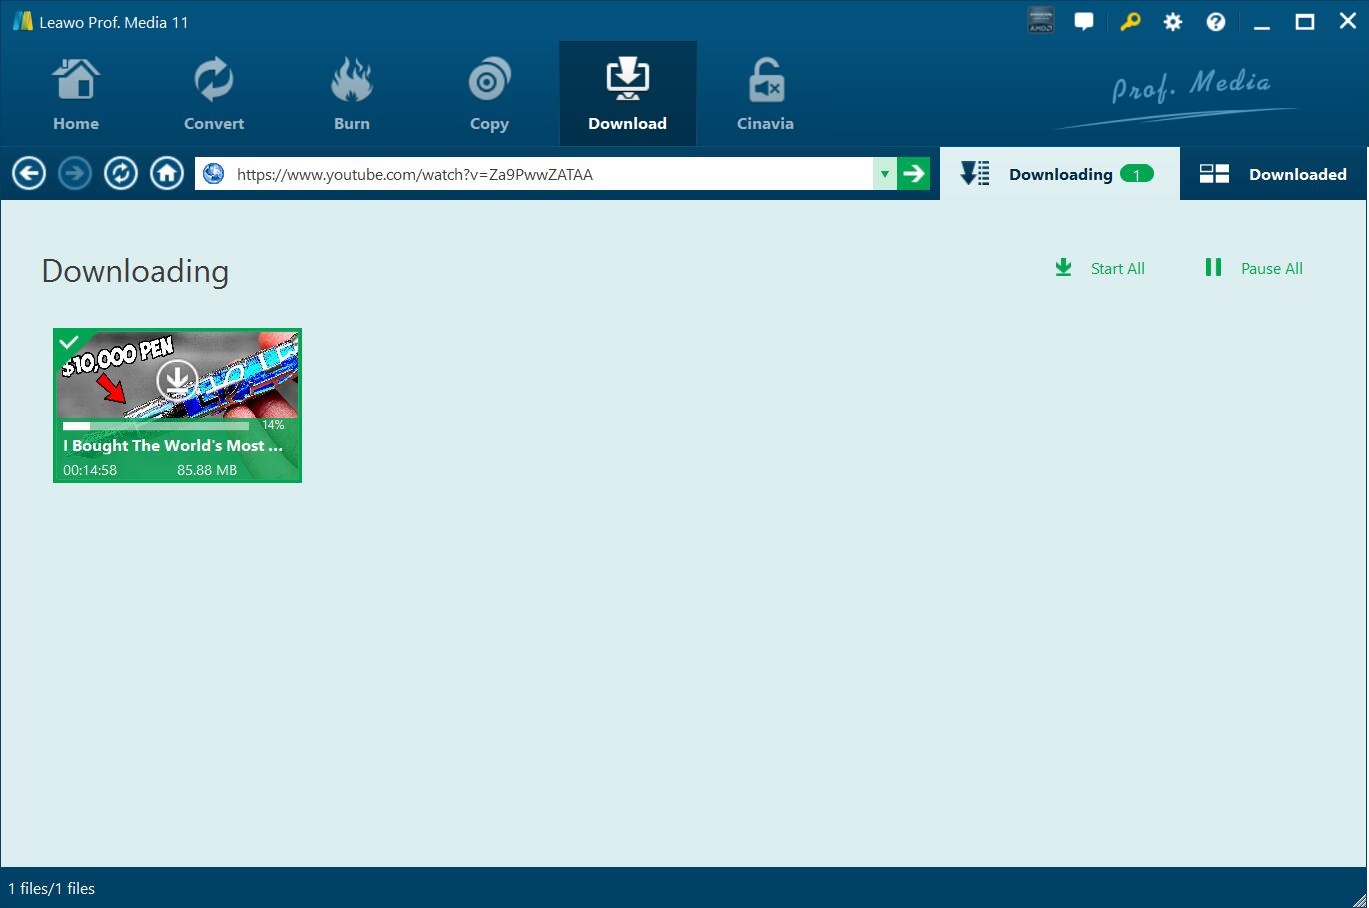
Step 4Start downloading
After click the "Download" icon on the right sidebar, the program will start downloading the chosen file, and you could see all videos downloading under "Downloading" tab, where you could click “Start All” or “Pause All” buttons to control downloading process.
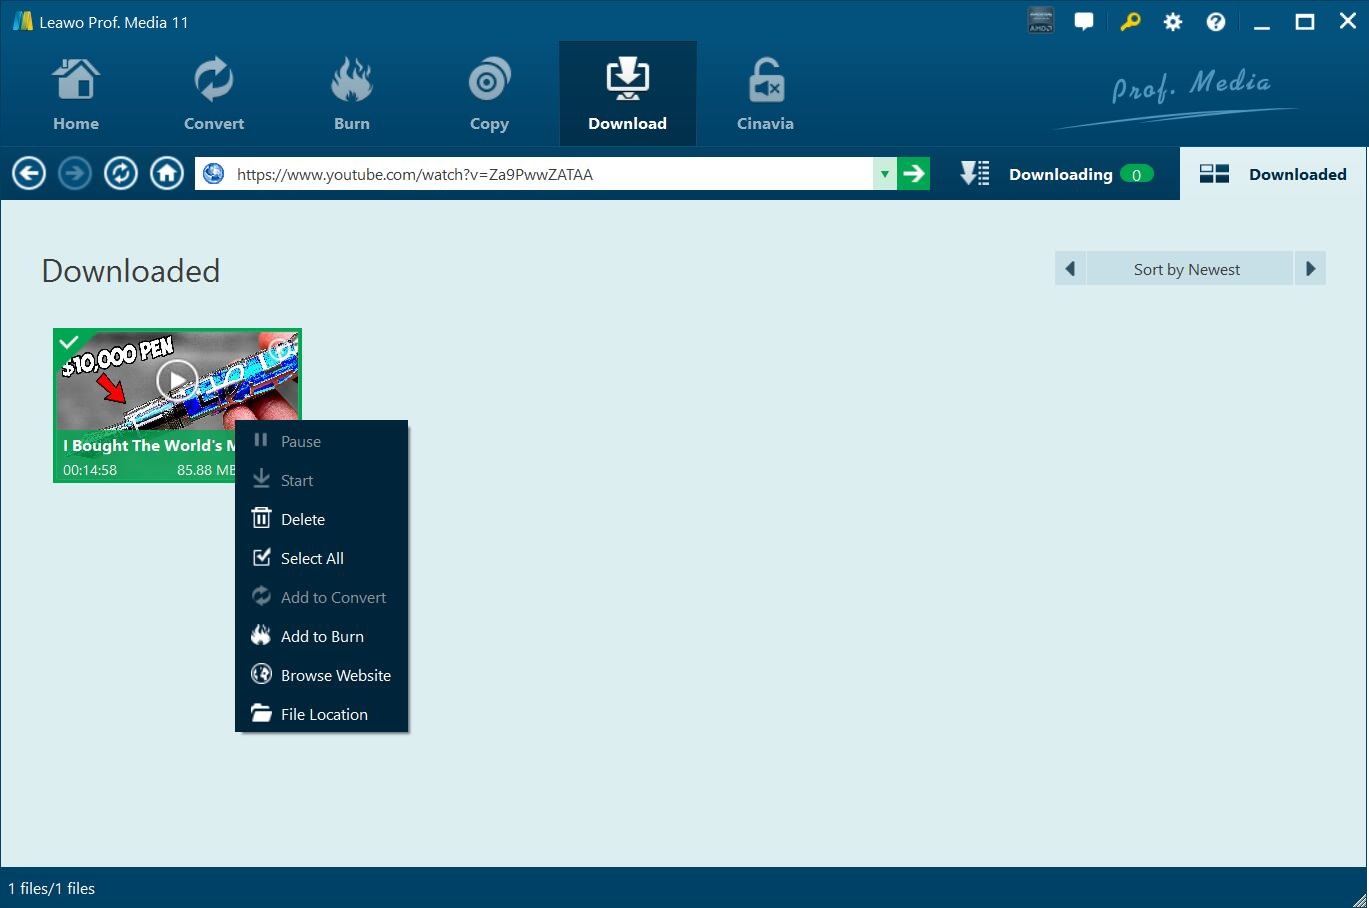
Step 5After-downloaded operation
When downloading is completed, you can find all downloaded videos under “Downloaded” tab. You could play back the downloaded videos, convert downloaded videos to other formats by right clicking and then selecting “Add to Convert” option, and burn downloaded videos to Blu-ray/DVD movies by right clicking and then selecting “Add to Burn” option.
How to Edit Videos
With Leawo Video Converter Ultimate in hand, you are able to tailor source content by virtue of its internal video editor. You can customize source video files under either “Convert” or “Burn” tab by clicking the “Edit” icon of loaded media file (or right click a file and then select “Edit” option) to enter the video editing panel where you are capable of trimming video length, adding image or text watermark, cropping video size, adjusting video effect and adding 3D effect.
Trim Video Length
Slide the twin green triangle icon on the playbar to get the video clip or video segment, or manually input value in"Start Time" and "End Time" trim video length.

Add Image or Text Watermark:
Click “Watermark” button on the left side of the video editing panel, enable the “Watermark” button to green on the main interface of the newly pop-up window, and then add image or text watermark onto output files. After that, you can set watermark parameters like transparency, size and position as well.

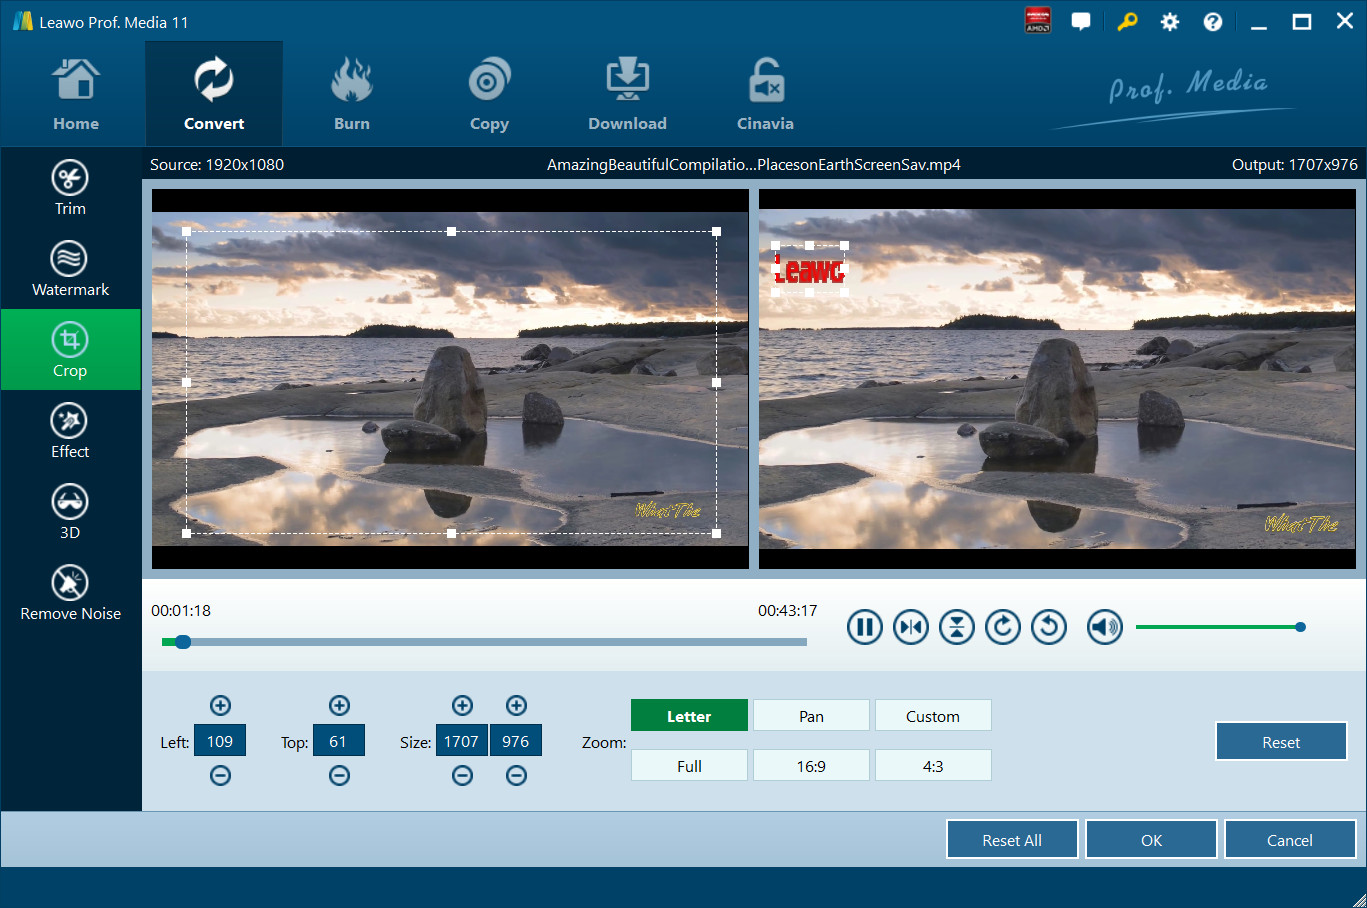
Crop Video Size:
Under “Crop” section, select a "Zoom" style first, and adjust the Top and Left values to get a precise dimension, or to crop video size by directly dragging the dot frame on the left Original Preview window. While you are cropping, you can preview the outcome on the right side of Output Preview.
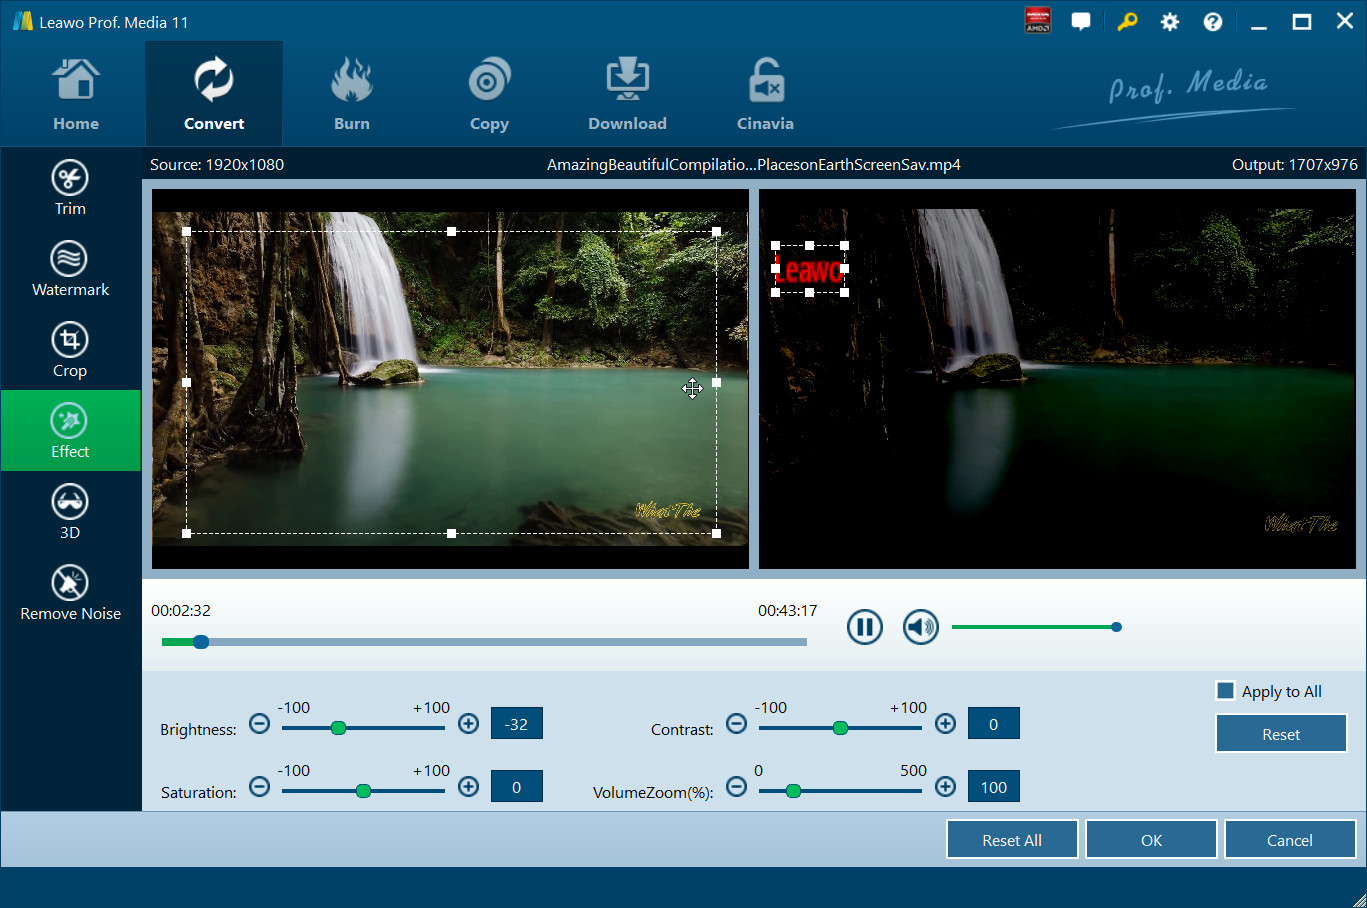
Adjust Video Effect:
Click “Effect” tab for video effect adjusting, and then simply drag the slides of "Brightness", "Contrast", "Saturation" and "VolumeZoom" to adjust the output video effect. Press "OK" to confirm the setting.
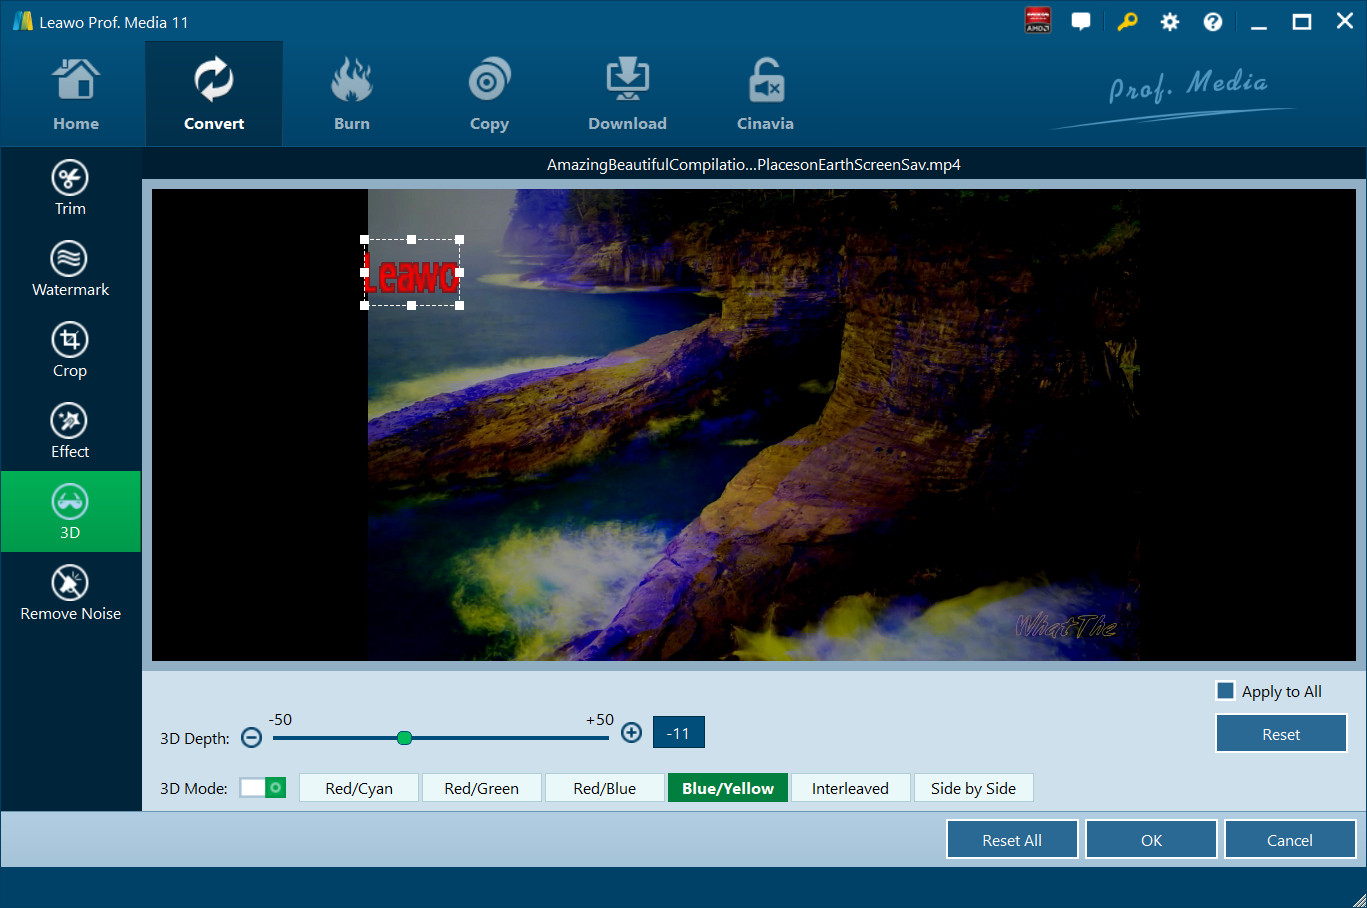
2D to 3D Converting
Leawo Video Converter Ultimate empowers you to get output files with vivid 3D effects. On the editing panel, click “3D” tab, slide “3D Mode” to green, and then select one 3D effect from 6 different 3D effects provided: Red/Cyan, Red/Green, Red/Blue, Blue/Yellow, Interleaved, and Side by Side. For advanced purpose, 3D depth ranging from minus 50 to plus 50 is open for setting.
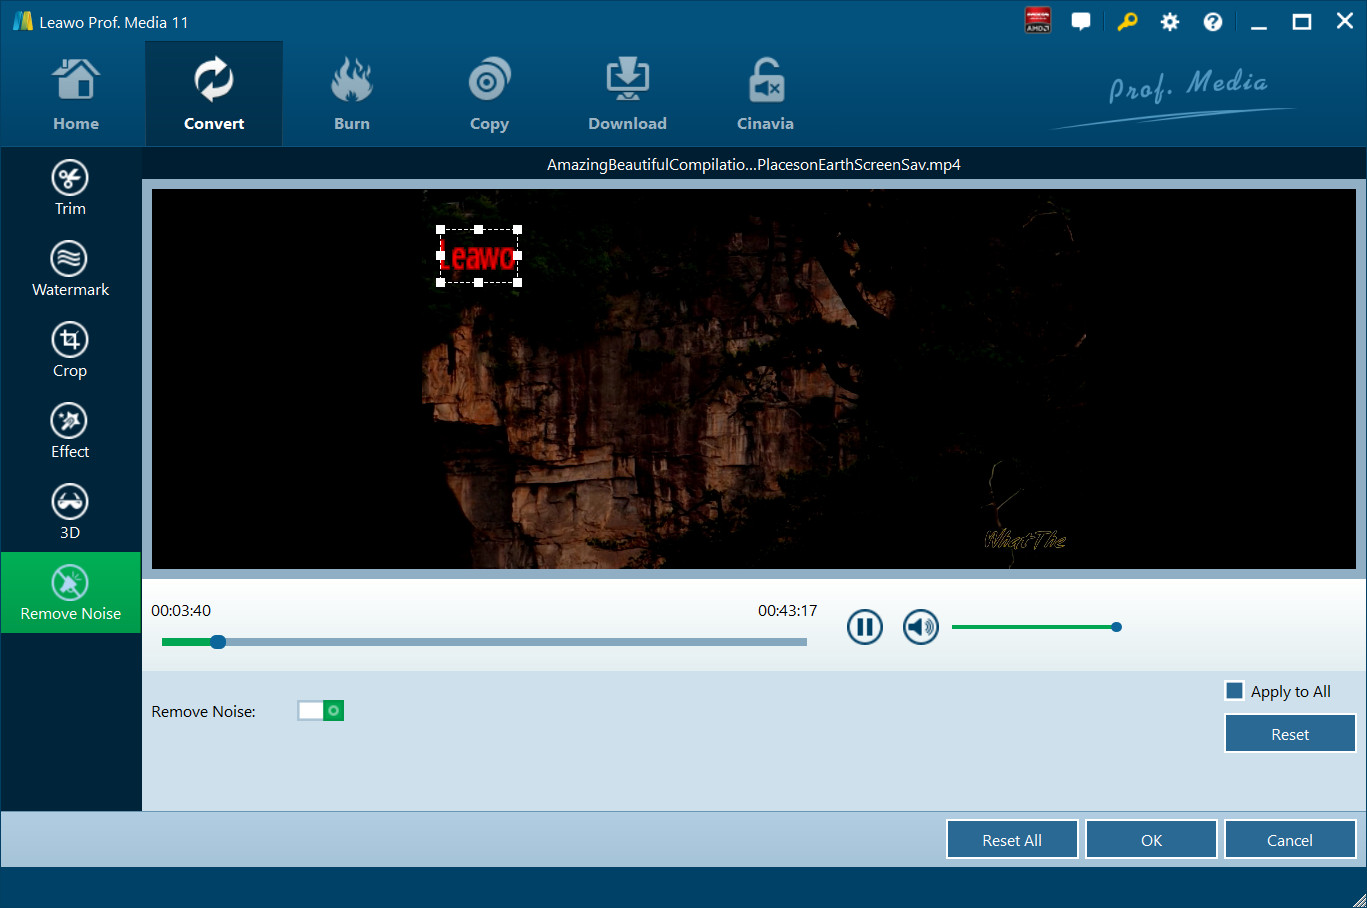
Remove Noise
Leawo Video Converter Ultimate enables you to remove noise from source video files for both converting videos and burning videos to DVD. Open the "Remove Noise" tab and then enable the "Remove Noise" option to remove noise from loaded video files.
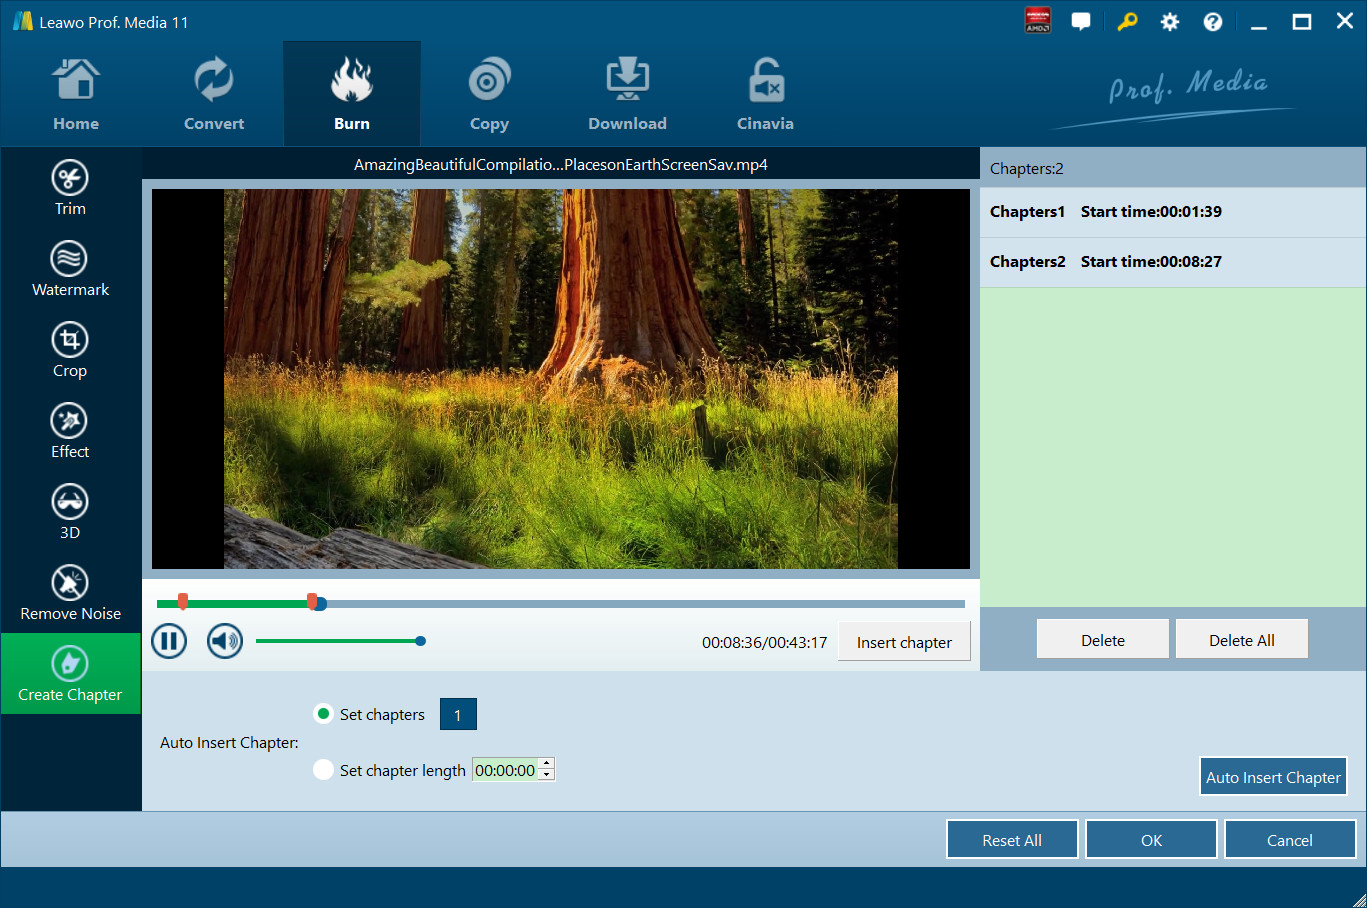
Create Chapters
For burning videos to DVD, under the "Burn" module, Leawo Video Converter Ultimate enables you to create chapters for output DVD content as you like. Just open the "Create Chapters" tab, play back the loaded videos, and then click the "Insert chapter" button at any place you want to insert a chapter mark. You could also delete inserted chapter mark as you like.
How to Make Photo slideshow
. Leawo Video Converter Ultimate can turn photos or photo folder into photo slideshow first, and convert it into more than 180 formats to meet different requirement.
Step 1Import Photos or Photo Folder
Open the "Convert" module and then click the "Add Photo" button to import photos to creat photo slideshow. Optionally, you can "Add Photo Folder" to import photo folder. Photo slideshow is generated the moment photos or photo folder is imported into the program. You could play back and edit generated photo slideshows afterwards on the internal media player and video editor respectively.

Step 2Choose Output Format
Click the drop-down list named "MP4 Video" by default next to the "Add Photo" button and then select "Change" option to call out the Profile panel, on which you shall select output format from various profile options.
Step 3Output Photo Slideshow
After output format setting is completed, you will be returned to the main interface where you can see a big green "Convert" button, by clicking it to select output directory in the "Save to" box on the popup sidebar. Finally, click the other “Convert” button at the bottom of the pop-up sidebar to output photo slideshow in format chosen.
How to Burn Photo Slideshow
Capable of burning photo slideshow to Blu-ray/DVD, Leawo Video Converter Ultimate could burn your photo collections into Blu-ray/DVD content for well keeping your precious moment.
Step 1Import Photos or Photo Folder
Enter the burning program by clicking the "Burn" button on the upper menu of the interface, and then click the "Add Photo" button to import photos. A batch of photos loading is available by clicking "Add Photo Folder" instead. Photo slideshow is generated the moment photos or photo folder is imported into the program. You could play back and edit generated photo slideshows afterwards on the internal media player and video editor respectively. Before the burning process takes place, you are required to set output disc type, quality and aspect ratio at the bottom.
Step 2Select disc menu
There are various templates available for disc menu choosing on the right sidebar. After choosing a template, , you could get an instant preview by clicking the eye icon at the middle of selected template. Also, you can disable disc menu setting by clicking "No Menu" option. If you cannot find the suitable template, you can choose "Online" or "Custom" to find out more.
You could tailor disc menu based on your personal preference. Click the pencil icon which means "edit" function to enter the disc menu designing window, where you could add background music/image/video, change title content and position, adjust text font, color, size, etc. After setting is complete, you can avoid the same setting again by clicking the blue "Save" button to save it as custom template for future use.
Step 3Output Photo Slideshow in Blu-ray/DVD
Click the green “Burn” button on the submenu bar to pop up sidebar, where you shall choose the container type (choose at least one type from Folder, ISO File and Disc), set Disc Label and Save to options. Finally, click the other “Burn” button at the bottom of the sidebar to start outputting photo slideshows in Blu-ray/DVD files.
Note: You shall insert a blank and writable Blu-ray disc or DVD disc into the Blu-ray/DVD drive beforehand if you would like to burn photo slideshow into Blu-ray/DVD disc.
How to Edit Photo Slideshows
Leawo Video Converter Ultimate allows you to use the built-in photo slideshow editor to edit generated photo slideshow when photo slideshow making or burning. After the gerenation of photo slideshow, you will be guided into the editing panel when you click the "Edit" icon or right click the generated slideshow and then select "Edit" option.
Step 1Edit photo slideshow video
Under "Video" section, you could adjust photo order, add external photos to expand the slideshow, set the output video effect like photo duration, transition effect and transition duration. You can choose whether to check "Auto Rotate Photo" or not. Finally, press "OK" to confirm the setting.

Step 2Edit photo slideshow audio
Under "Audio" section, you could import audio or song as background music and set the output audio effect like fade in, fade out and loop play. After audio effect choosing, don't forget to confirm the setting by pressing "OK" button.

![]()
Users Say
As consumers, I love companies offering solid product guarantees. It proves the company has faith in its product, and is making a solid effort to gain your trust.
-From Donald through our support center
Social Network
Join Our Newsletter: